Square inventory setup and management guide

Square inventory makes it easy to track stock, update quantities, and manage your products from one place. Built into Square’s point-of-sale (POS) system, these tools let you create items, organize variants, and monitor inventory in real time, from your dashboard or mobile app.
I’ll walk through how to manage inventory with Square step by step, from creating items and enabling tracking to running reports and monitoring stock performance. To follow along, you’ll need a Square account so you can set up your items and inventory as you go.
Inventory management features are available with Square Plus plans, starting at $49 per month per location, with a 30-day free trial.
Create a Square account to get started.
Watch the quick video below for a fast overview before diving into the full tutorial:
Square inventory management helps you stay on top of your stock without needing a separate system. You can track inventory in real time as sales come in, so your counts stay accurate whether you’re selling in-store, online, or across multiple locations.
You can also set low stock alerts to avoid running out of popular items and import products in bulk using a spreadsheet to save time during setup. As you sell, Square automatically updates quantities and generates inventory reports that show performance, cost of goods sold, and sell-through rates.
If you run more than one location, Square keeps your inventory synced so you can monitor stock levels for each store and transfer items as needed. This makes it easier to manage purchasing, reduce stockouts, and keep operations running smoothly.
Before you start
Before setting up Square inventory, make sure you have everything you need to move through the steps smoothly:
- A free Square account and access to the POS app or online dashboard
- Access to the Items dashboard to create and manage products
- Basic product details (item names, SKUs, pricing, categories)
- A CSV or Excel file ready if you plan to import inventory in bulk
- A plan for where to manage tasks:
- Use the dashboard for bulk edits, imports, and reports
- Use the POS app for quick stock updates and checks during sales
This will make it easier to follow along and set up your inventory without interruptions.
Step 1: Create your item library
The first step in Square inventory management is to build your item library. This is where all of your products, pricing, and details live, and it powers both your POS and inventory tracking.
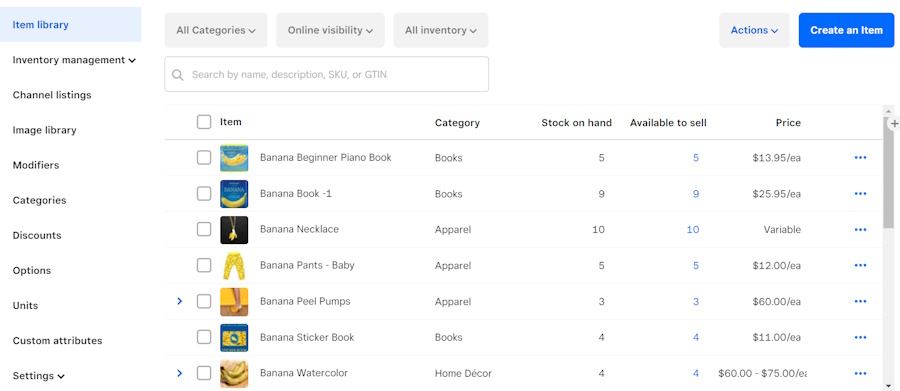
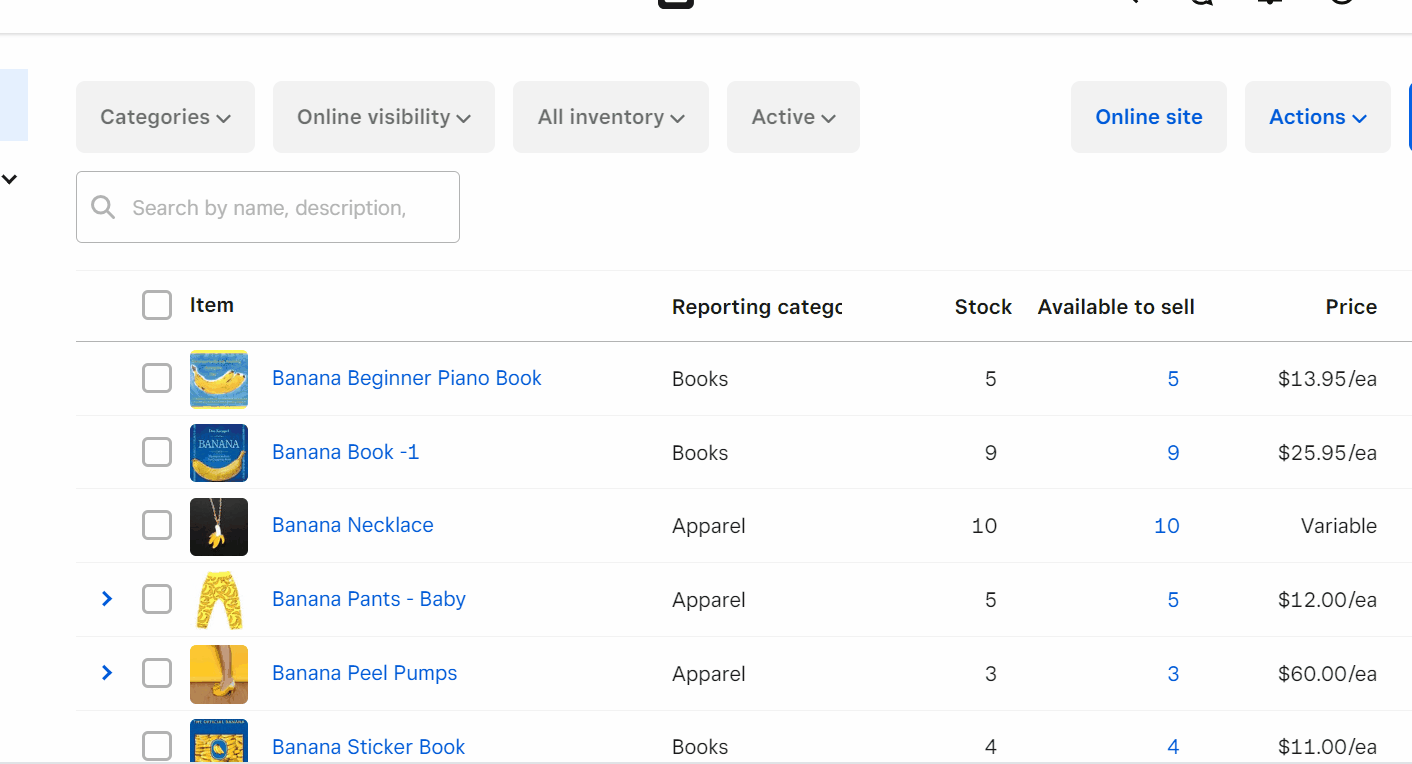
The item library lists all your existing products on one page and lets you create new items.
You have two options when adding items to your library — manually or bulk import.
Add items manually
To add items manually, go to your Items dashboard and select Create an Item. From there, enter your basic product information, including the item name and price. If you plan to track inventory, make sure to enable stock tracking and enter your starting quantity.
At a minimum, you’ll need:
- Item name
- Price
- Category (recommended for organization)
- SKU (optional, but helpful for tracking)
You can create items from both the Square Dashboard and the POS app, but the dashboard is easier for full setup and adding detailed product information.
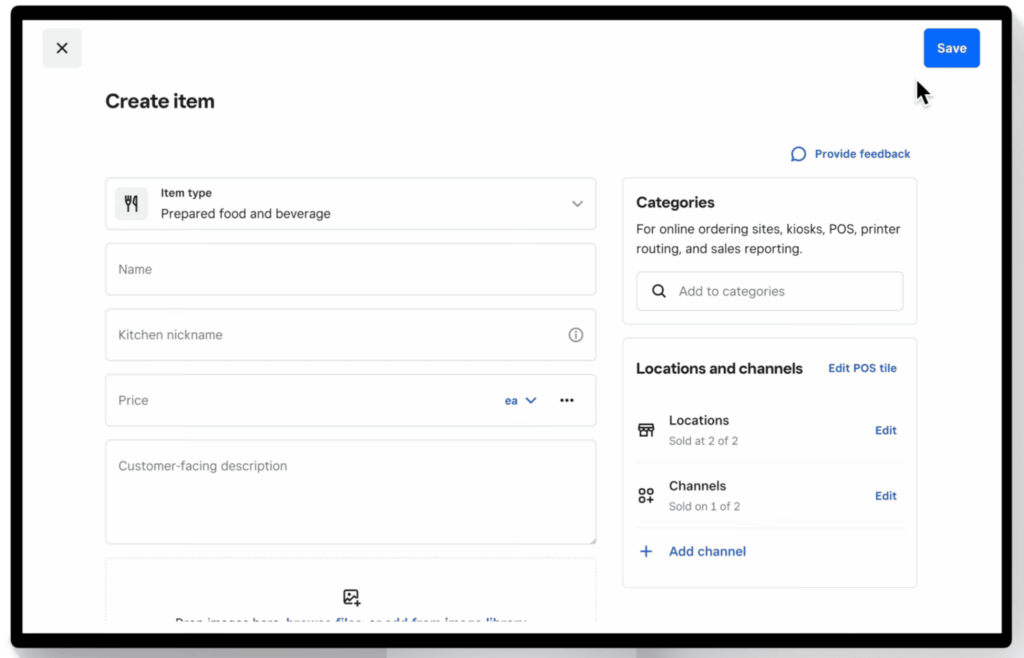
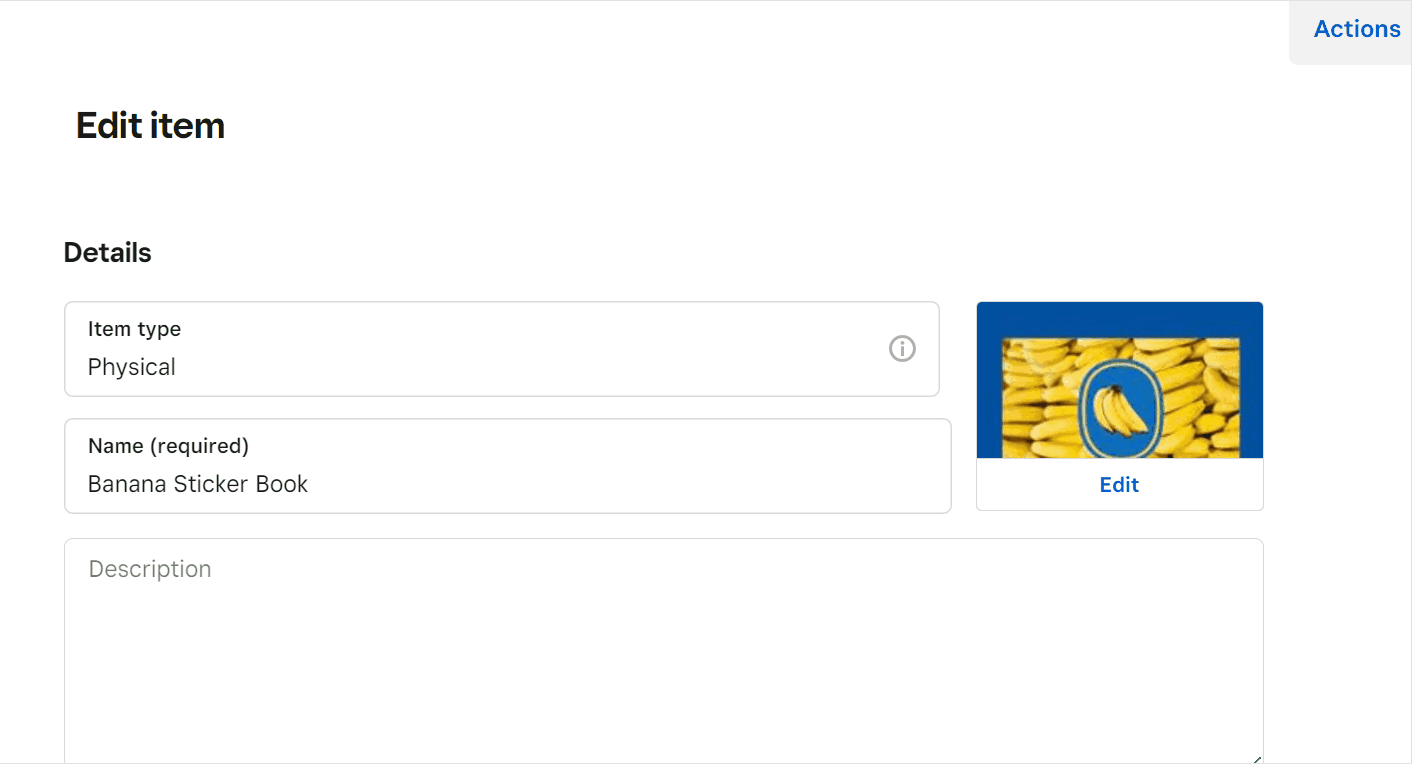
On Square’s “Create item” page, specify a new product’s name, description, and type (physical or digital product, food, event, etc.)
Import items in bulk
If you have an existing inventory, you can take advantage of the Square bulk inventory intake feature. Select “Actions” and then “Import Library” from your Item Library; this allows you to download a Square-compatible spreadsheet where you can fill out product information in bulk and add all your existing inventory in a single upload.
Or, if you don’t want to use the downloadable sheet, you can upload your own existing inventory list by simply dragging and dropping, then clicking “Upload.” You’ll be asked whether you intend to simply modify the stored inventory list (if there is one in the system), or overwrite it entirely.
When uploading an inventory list (either updating the current list or putting in a completely new one), you can use either Excel (.xlsx) or CSV (comma-separated values) files.
Once you’ve uploaded your inventory list using either method, click “Next.” At this point, Square might prompt you to confirm that item attributes are matched to the correct columns in your import file.
Square will take you through steps to review, edit, and approve the information. If everything looks good, click “Confirm” in the upper right. If not, fix it, and then click “Confirm.”
At this stage, your items should appear in your inventory catalog.
Step 2: Add images, categories, and descriptions
Once your items are created, you can enhance them by adding images, categories, and descriptions. This helps keep your inventory organized and improves how items appear in your POS and online store.
Add images
Adding images helps describe your product and makes it easier to identify at checkout. Images appear on your POS screen and online store, helping speed up checkout and reduce errors during sales.
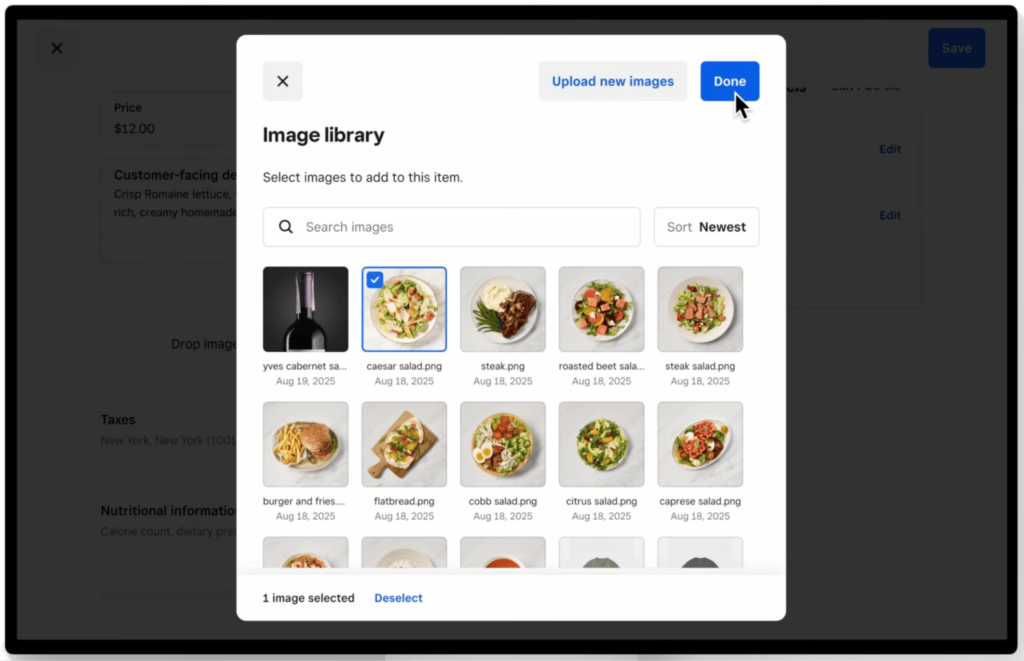
Select or upload product images from your image library to enhance item listings in your POS and online store.
To edit your inventory item image, click Edit in the image box for a specific item. You’ll be prompted to select a new primary item image, which will then become the tile image for that product.

TIP: Use Photo Studio. Square’s Photo Studio app lets you edit product photos with AI assistance, making the final images look as attractive as possible to buyers
Set categories
Use categories to group similar products together, which makes it easier to track inventory and run reports by product type. Well-structured categories also make it easier for staff to find items quickly during checkout.
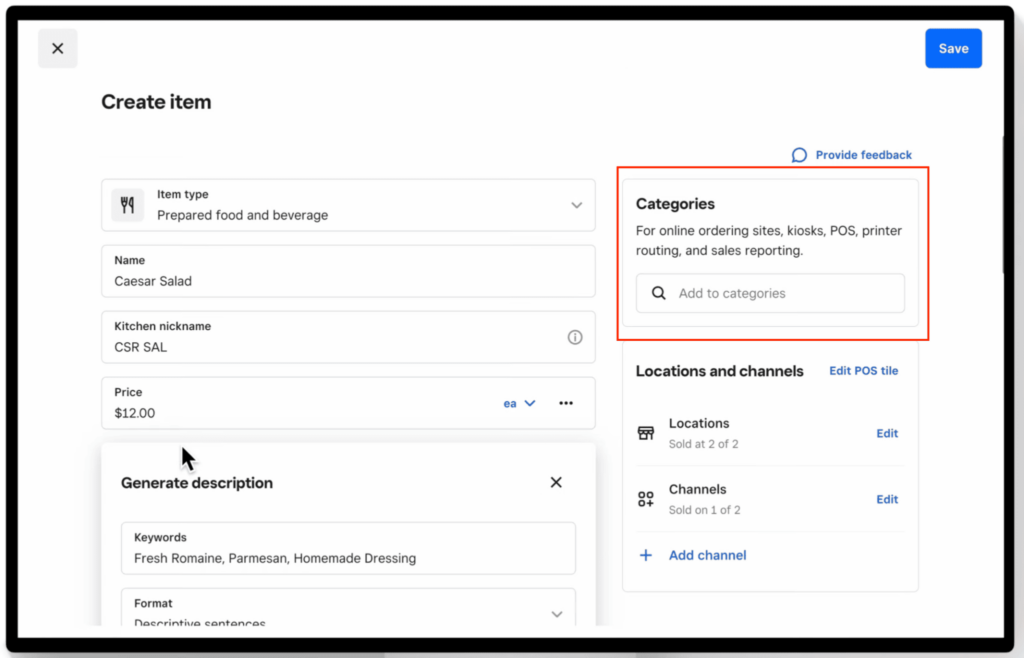
Assign categories to organize products and improve reporting across POS and online channels.
Under Categories in the second column of the Create Item page, start typing the category where you want the item to be filed. Square will autofill the field based on existing categories. If it’s a new category, Square will automatically create one when you hit Enter.
TIP: Keep category names consistent and simple (for example, “T-shirts” instead of mixing “Tees” and “Shirts”) to improve reporting accuracy.
Set product descriptions
Clear descriptions can be helpful for staff and customers, especially if you sell similar items or manage a large inventory. They also improve your online store listings by giving customers more context about each product.
Square has rolled AI into its product suite, so you can generate product descriptions directly in the dashboard and then edit them to match your brand voice.

Use Square’s built-in AI tool to generate product descriptions based on keywords directly in the item editor.
TIP: Focus on key details like size, material, or use case to make descriptions more useful without making them too long.
Read more:
Step 3: Add item variations
Item variations are the different versions of the same product, such as size, color, or style. In Square, variations are the actual sellable items, each with its own price, SKU, and inventory count. For example, a T-shirt can have variations like small, medium, and large, or different colors. Each variation is tracked separately, which helps you manage inventory and sales more accurately.
To add variations, scroll down a bit from the Create item page and select Variations.
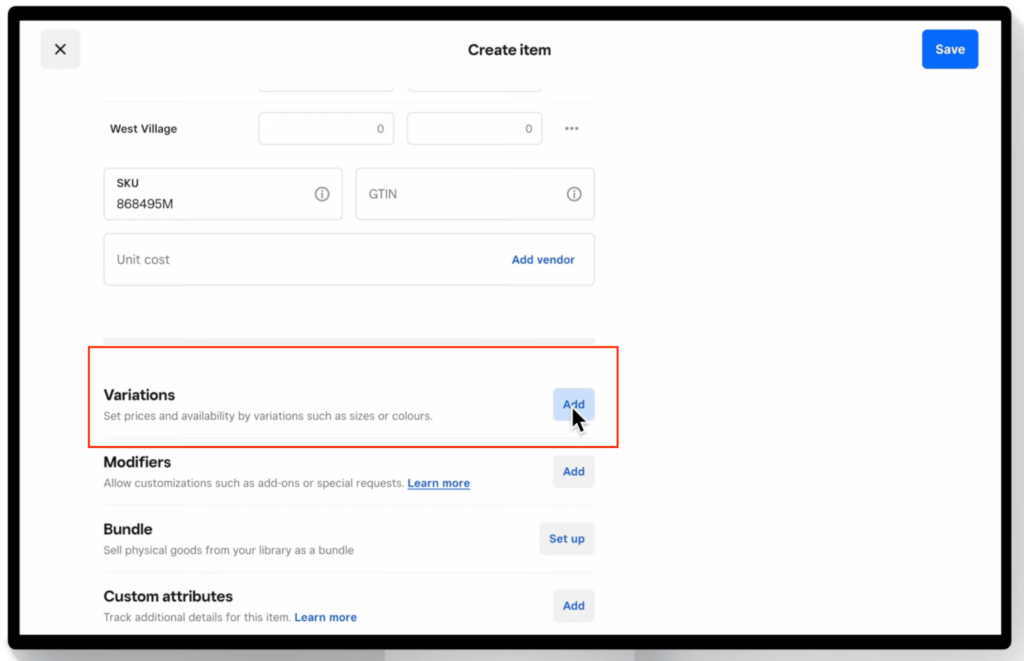
Click “Add” in the Variations section to create different versions of a product, such as size or color.
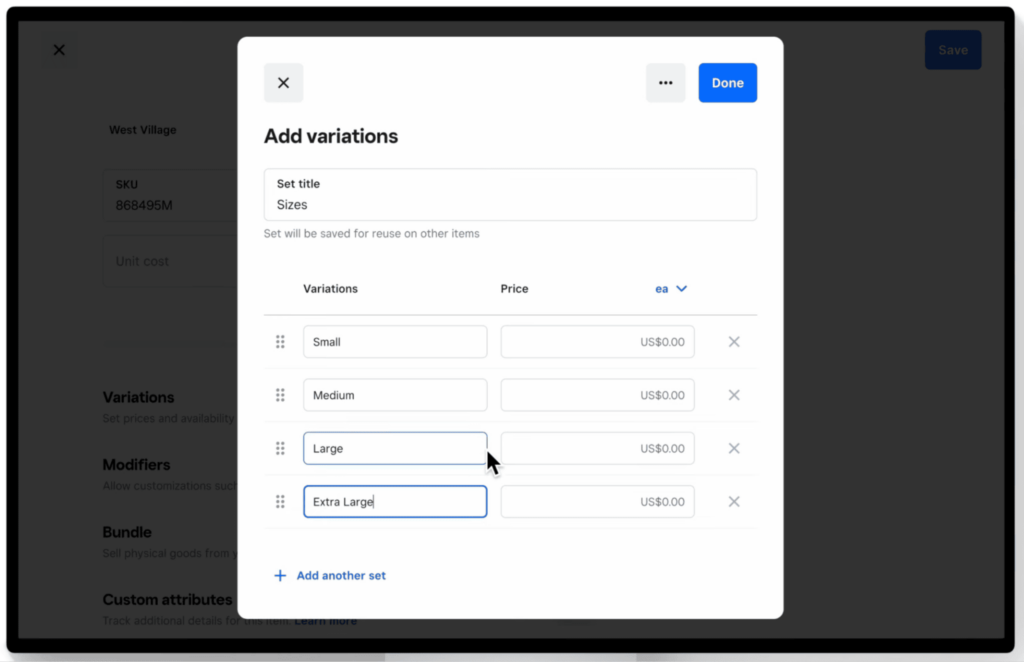
Enter a name for each version of the product, then assign pricing. Click Done when finished.
TIP: Use variations whenever you need to track stock separately (for example, each size or color).
Use option sets to create variations faster
Option sets are the attributes that define your variations, such as size or color. Instead of creating each variation manually, you can use option sets to automatically generate combinations.
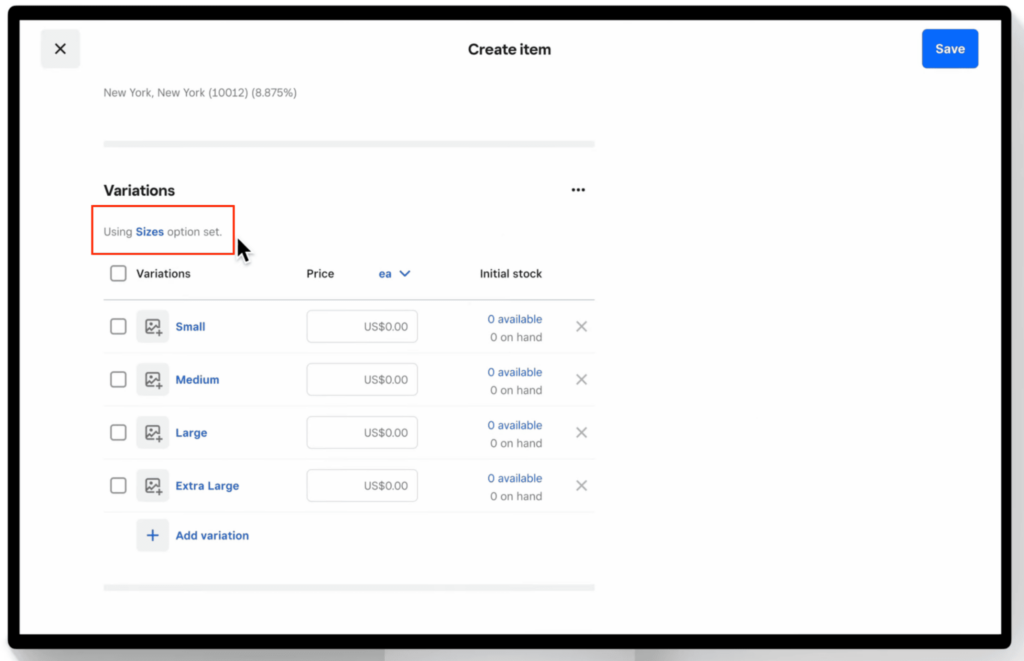
For example, if you create:
- Size: Small, Medium, Large
- Color: Red, Blue
Square can automatically generate all combinations (like small red, medium blue, etc.), saving time during setup.
To do so:
- Sign in to your Square Dashboard and go to Items & Services (or Items & Inventory), then select Items.
- Open an item and click Variations, then select Add. Enter a set title (for example, “Apparel sizes”), and either choose from your saved option sets or type to create a new one.
- Add your variation options (such as Small, Medium, Large). If you want to include another attribute, like color, click Add another set and repeat the process.
Click Done to review all variation combinations that will be created. Square will automatically generate every possible combination based on your option sets, and you can deselect any you don’t want before saving.
TIP: Use option sets if you have multiple items with the same attributes (like apparel), so you don’t have to recreate variations each time.
Step 4: Assign items to locations
The last step in creating the item is to assign it to a sales location. Assigning items to locations and sales channels ensures your products are available where you need them — whether that’s in-store, online, or through delivery apps. This step is especially important if you manage inventory across multiple locations or sell through more than one channel.
Assign items to locations and sales channels
Under Locations and Channels in the right column, select the applicable locations where the item will be available.
To assign items:
- Sign in to your Square Dashboard and go to Items & Services (or Items & Inventory), then select Items.
- Select an existing item or click Create item.
- Under Locations and channels, click Edit and choose the locations and sales channels (such as POS, online store, or delivery apps).
- Click Done, then Save.
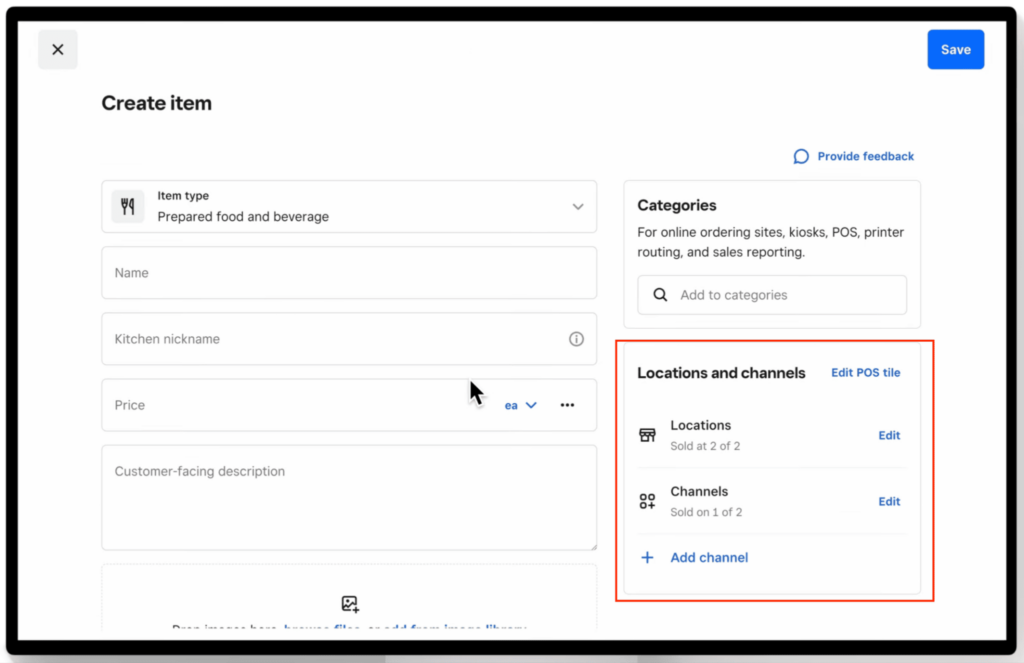
Assign items to specific locations and sales channels to control where products are available.
Create location overrides
By default, items are available across all selected locations and channels. However, you can customize availability so that an item appears in some locations but not others.
For example, you might sell an item online across all locations, but only want it available for pickup at certain stores.
To create location-specific overrides:
- Sign in to your Square Dashboard and go to Items & Services > Items.
- Select an item or create a new one.
- Under Locations and channels, click Edit next to Channels and visibility, then select Customize channels by location.
- Expand a location to view its channels.
- Select or deselect where the item should be available.
- Click Save.
Step 5: Set initial inventory
Once your items are created and assigned to locations, the next step is to add your starting inventory counts. This ensures your stock levels are accurate before you begin selling.
To set initial inventory:
- Go to your item in the Square Dashboard.
- Scroll down to the Manage Inventory section.
- Enter the starting quantity for each location in the Initial stock column.
- Click Save to apply your inventory counts.
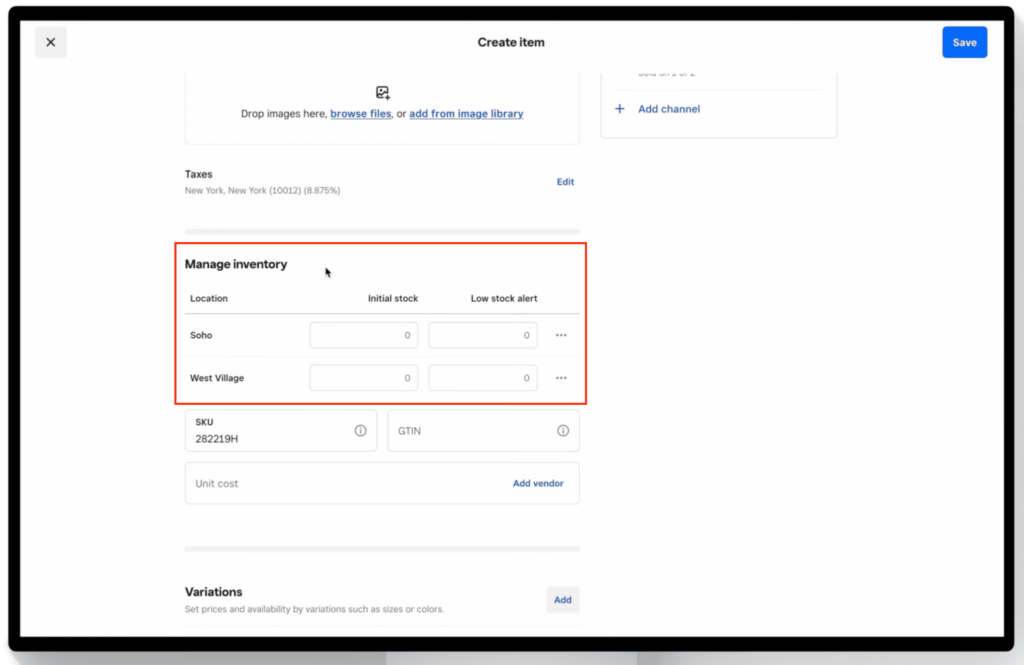
If you have multiple locations, you can enter different quantities for each one. This helps you track stock separately by store or warehouse.
TIP: Double-check your initial counts before saving, since these numbers will be used as your baseline for inventory tracking and reporting.
Step 6: Manage or update inventory
After setting your initial inventory, you’ll use the same Manage inventory section to keep your stock levels up to date as products are received, sold, or adjusted.
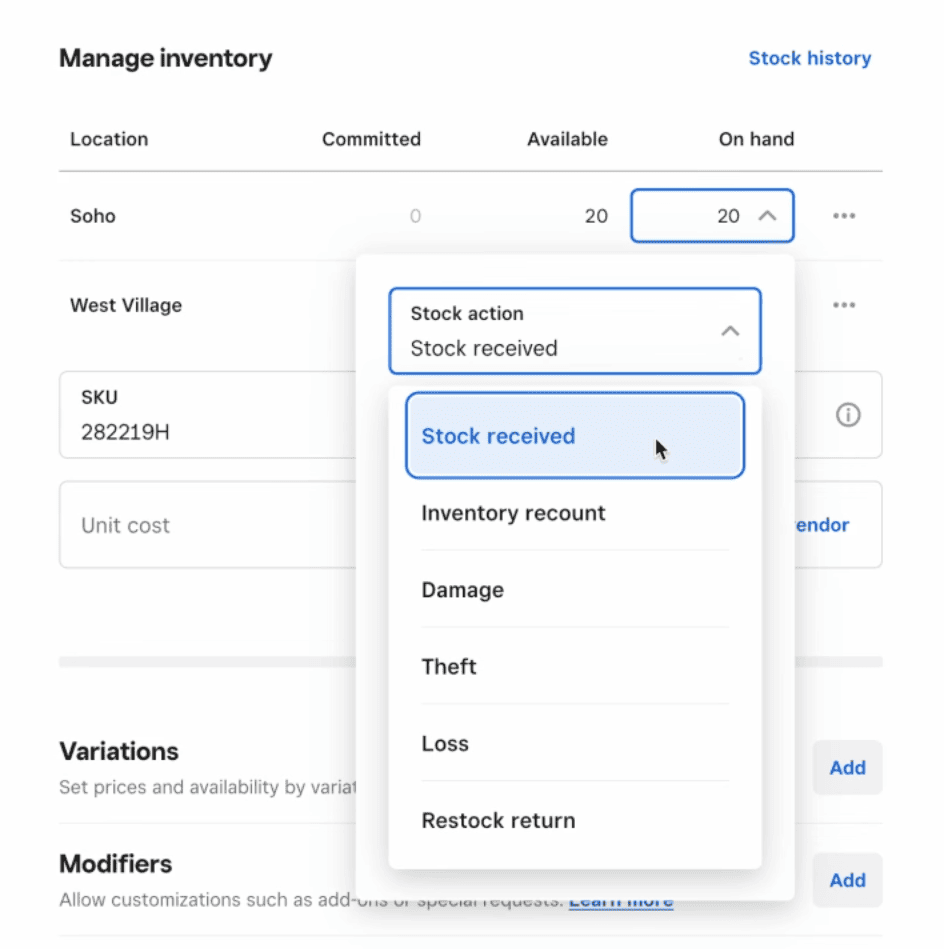
To update inventory for an item:
- Go to the item and scroll to the Manage inventory section.
- Click the dropdown in the On hand field.
- Select a stock action, such as:
- Stock received
- Inventory recount
- Damage
- Theft or loss
- Restock return
- Enter the quantity and click Done, then Save.
Square will automatically update your inventory totals based on the action you select, helping you keep accurate records of stock changes.
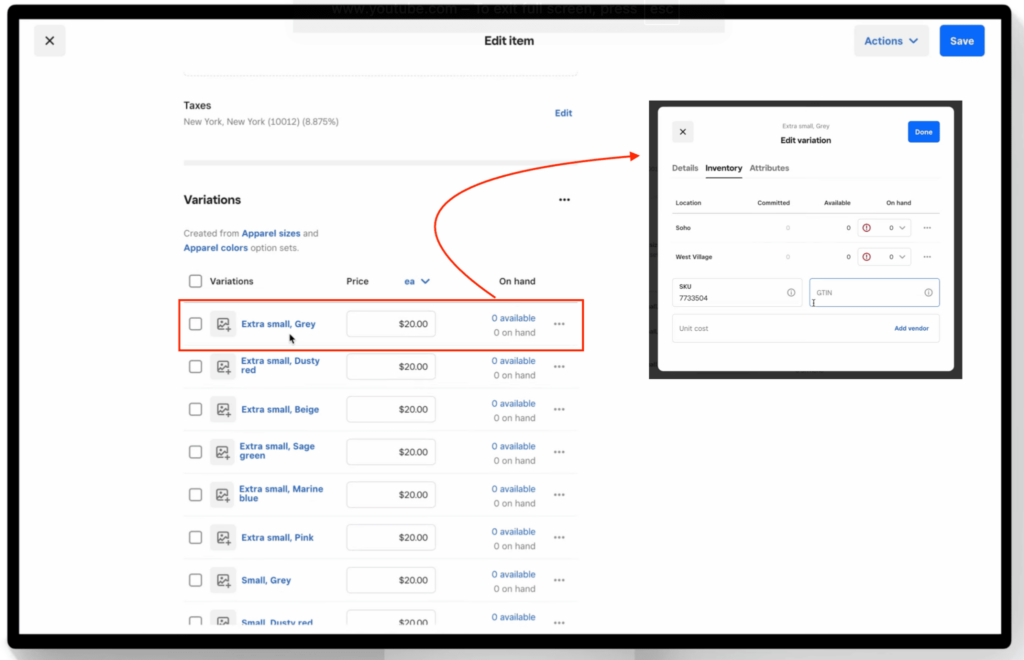
Updating inventory for variations
If your item has multiple variations (like size or color), inventory is tracked separately for each one.
- Open the item and scroll to the Variations section.
- Click the blue text in the On hand column for a specific variation.
- Select a stock action and enter the updated quantity.
Click Done, then Save.
Track stock vs track availability
Square lets you track inventory either by stock count or by availability, depending on your business type.
- Track stock: Best for retail products where you count physical units
- Track availability: Better for prepared food or items that are made fresh
To switch tracking types:
- Click the three dots next to the On hand field.
- Select Change tracking.
- Choose Track by availability.
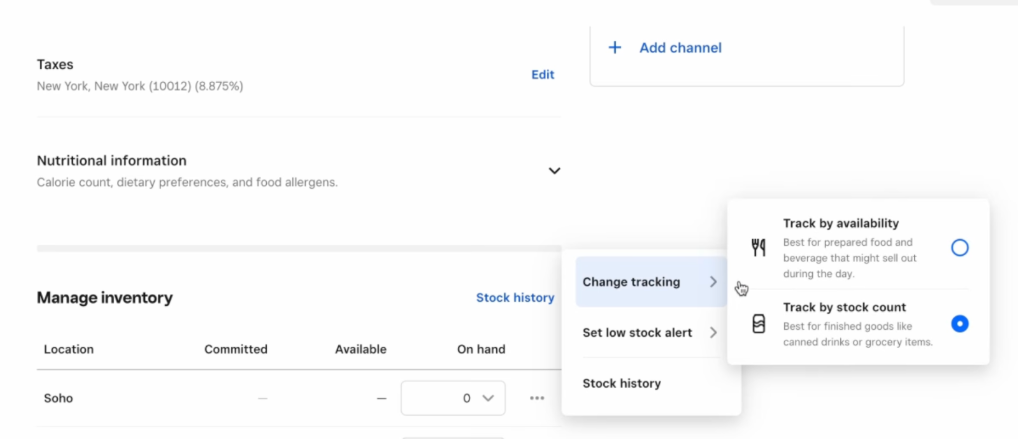
You can then mark an item as available or sold out at each location.
Step 7: Enable inventory tracking and low stock alerts
With your quantities set, the next step is to enable inventory tracking and low stock alerts. These features allow Square to automatically update your stock levels as you make sales and notify you when it’s time to reorder.
When inventory tracking is turned on, Square deducts items from your stock count in real time. Low stock alerts let you set a custom threshold, so you’re notified when inventory runs low.
For example, if you set a low stock alert at 10 units for a red blouse, Square will notify you once your inventory reaches that level, helping you restock before you run out. While this feature is optional, it’s one of the most useful tools for preventing stockouts and staying on top of inventory.
Turn on inventory tracking and alerts
To enable tracking and alerts:
- Go to your item and open the Edit item page.
- Scroll to the Variations section.
- Click Edit stock tracking.
- Toggle Track stock to On for each variation you want to track.
- Toggle Low stock alerts to On.
- Enter the quantity threshold for alerts.
- Click Done, then Save.
![]()
![]()
TIP: Set your alert threshold based on how quickly you sell the item and how long it takes to restock. Fast-selling products should have higher alert thresholds.
Square will send low stock alerts when inventory drops at or below your set threshold. You may continue to receive alerts until stock is replenished or alerts are turned off, helping ensure you don’t miss a restock window.
This feature also works for restaurants and prepared items, allowing you to track when dishes or ingredients are running low.
Once inventory tracking and alerts are set up, Square handles most of the work for you in the background. Your stock levels will update automatically with every sale, and you’ll have clear visibility into when it’s time to restock. From here, you can focus on monitoring your inventory, making adjustments as needed, and using reports to guide smarter purchasing decisions.
How to check your current stock levels
To view your inventory at a glance, go to your Stock Overview in the Square Dashboard. This page shows your current inventory levels across all items and locations.
From here, you can:
- Filter by location to see stock at a specific store
- Filter by category to review product groups
- Sort items to quickly identify low stock or high-volume products
You can also take quick actions directly from the list, such as adjusting quantities or opening an item to make updates.
How to update inventory in bulk after setup
If you need to update inventory for multiple items at once, you can do it using a spreadsheet export and re-import.
To update inventory in bulk:
- Go to your Items dashboard and export your item library as a CSV file.
- Open the file and update the quantity fields for each item or variation.
- Save the file, then return to Square and upload it to replace your existing inventory data.
This method is useful for large updates, such as receiving new shipments or correcting stock counts across many items.
TIP: Always keep a backup copy of your original file before making bulk edits.
How to use Square inventory reports
Once your items are set up and inventory tracking is enabled, Square automatically collects data on your stock and sales. You can use inventory reports to understand product performance, control costs, and make smarter purchasing decisions. To access reports, go to Reports in your Square Dashboard sidebar and select Inventory Reports.
- Cost of goods sold (COGS): The cost of goods sold (COGS) report shows how much it costs you to produce or purchase the items you sell. This includes direct costs like materials and labor, but excludes indirect expenses such as marketing or shipping. Use this report to evaluate your pricing strategy and understand your profit margins. If your COGS is too high relative to your selling price, it may be time to adjust pricing or sourcing.
- Vendor sales: The Vendor Sales report shows which vendors supplied the products sold during a specific time period. This helps you identify which suppliers are tied to your best- and worst-performing items. You can use this data to decide which vendors to continue working with, which to reevaluate, and where to expand your product selection.
- Projected profit: The Projected Profit report uses historical sales data to estimate future profitability. You can break this down by location, item, or category to better forecast performance. This report is useful for planning inventory purchases and setting revenue goals based on past trends.
- Inventory by category: The Inventory by Category report shows the total value of your inventory grouped by product category. It also includes metrics like potential profit and profit margin by category. This helps you understand which types of products are performing best so you can adjust your inventory mix and focus on high-performing categories.
- Inventory sell-through: The sell-through report measures how quickly your inventory is selling compared to how much you have on hand. A high sell-through rate means products are selling quickly, while a low rate may indicate overstock or low demand. You can use this report to make decisions about reordering, discounting slow-moving items, or increasing stock for popular products. It also supports related actions like forecasting demand and planning promotions.
Frequently asked questions (FAQs)
Click through the following sections to learn more about Square Inventory’s functions, setup, and pricing.
To add inventory in Square, go to your Items dashboard, create or edit an item, and enter the quantity under stock tracking. You can also upload inventory in bulk using a CSV file if you’re adding multiple items at once.
Inventory management for Square is handled through the Items and Inventory dashboard, where you can track stock levels, adjust quantities, and set low stock alerts. Use the POS app for quick updates and the dashboard for bulk edits and reporting.
Yes, Square automatically updates inventory when you make a sale, process a return, or manually adjust stock. This only works after inventory tracking is enabled for each item.
To run a Square inventory report, go to Reports and select Inventory from the dashboard. From there, you can view key reports like inventory by category, sell-through rate, and cost of goods sold.
Yes, you can export your inventory by downloading your item library as a CSV file from the dashboard. This allows you to review, edit, or back up your inventory data.
Yes, Square lets you track and manage inventory across multiple locations. You can assign items to specific locations and monitor stock levels separately for each one.
Yes, Square works as a complete inventory management system for small businesses, with tools for tracking stock, managing items, running reports, and syncing inventory across sales channels.
Bottom line
Square inventory management gives you the tools to track stock in real time, automate updates, and understand how your products are performing. As you sell, Square updates your inventory automatically and provides reports that help you make smarter purchasing and pricing decisions.
Now that you know how to set up items, track inventory, and run reports, the next step is to put it into practice. Start by adding your first products, enable inventory tracking, and review your reports regularly to stay on top of stock.
Sign up for Square and start managing your inventory today.
Source link